First steps
This is the recommended guide for getting to know the product.
Note
You also might want to check out our basic Tarantool tutorial. It shows how to launch one Tarantool instance, create a space, build an index, and write data.
We recommend that beginners go through the current tutorial first and then see the basic tutorial to dive deeper into the product.
If you just want to run the complete tutorial code quickly, go to Launching an application.
Launch in the cloud
This tutorial is also available in the cloud. It’s free, and it’s the fastest way to start. To follow this tutorial in the cloud, go to try.tarantool.io.
However, you will still need to install Tarantool if you want to get better acquainted with it.
Run locally
For Linux/macOS users:
Install Tarantool from the Download page.
Install Node.js, which is required for the tutorial frontend.
Install the
cartridge-cliutility through your package manager:sudo yum install cartridge-cli
brew install cartridge-cli
To learn more, check the
cartridge-cliinstallation guide.Clone the Getting Started tutorial repository.
Everything is ready and organized in this repository. In the cloned directory, run the following:
cartridge build
cartridge start
Note
In case of a problem with cartridge build, run it with the --verbose flag
to learn about the source of the problem. If there is a problem with Node.js (npm):
- Check that Node.js is in the
$PATH. - Try forcefully removing the
node_modulesdirectory from the dependencies’ directories:
rm -rf analytics/node_modules front/node_modules
After that, try running cartridge build again.
If all else fails, please file us an issue on GitHub.
You’re all set! At http://localhost:8081, you will see the Tarantool Cartridge UI.
Running in Docker:
docker run -p 3301:3301 -p 8081:8081 tarantool/getting-started
That’s it! At http://localhost:8081, you will see the Tarantool Cartridge UI.
For Windows users:
Use Docker to get started.
Today, we will solve a high-performance challenge for TikTok using Tarantool.
You will implement a counter of likes for videos. First, you will create base tables and search indexes. Then you will set up an HTTP API for mobile clients.
The challenge doesn’t require you to write any additional code. Everything will be implemented on the Tarantool platform.
If you accidentally do something wrong while following the instructions, there is a magic button to help you reset all changes. It is called “Reset Configuration”. You can find it at the top of the “Cluster” page.
Everything you need to know to get started:
A Tarantool cluster has two service roles: router and storage.
- Storage is used to store data.
- Router is an intermediary between clients and storages. It accepts a client’s request, takes data from the proper storage, and returns it to the client.
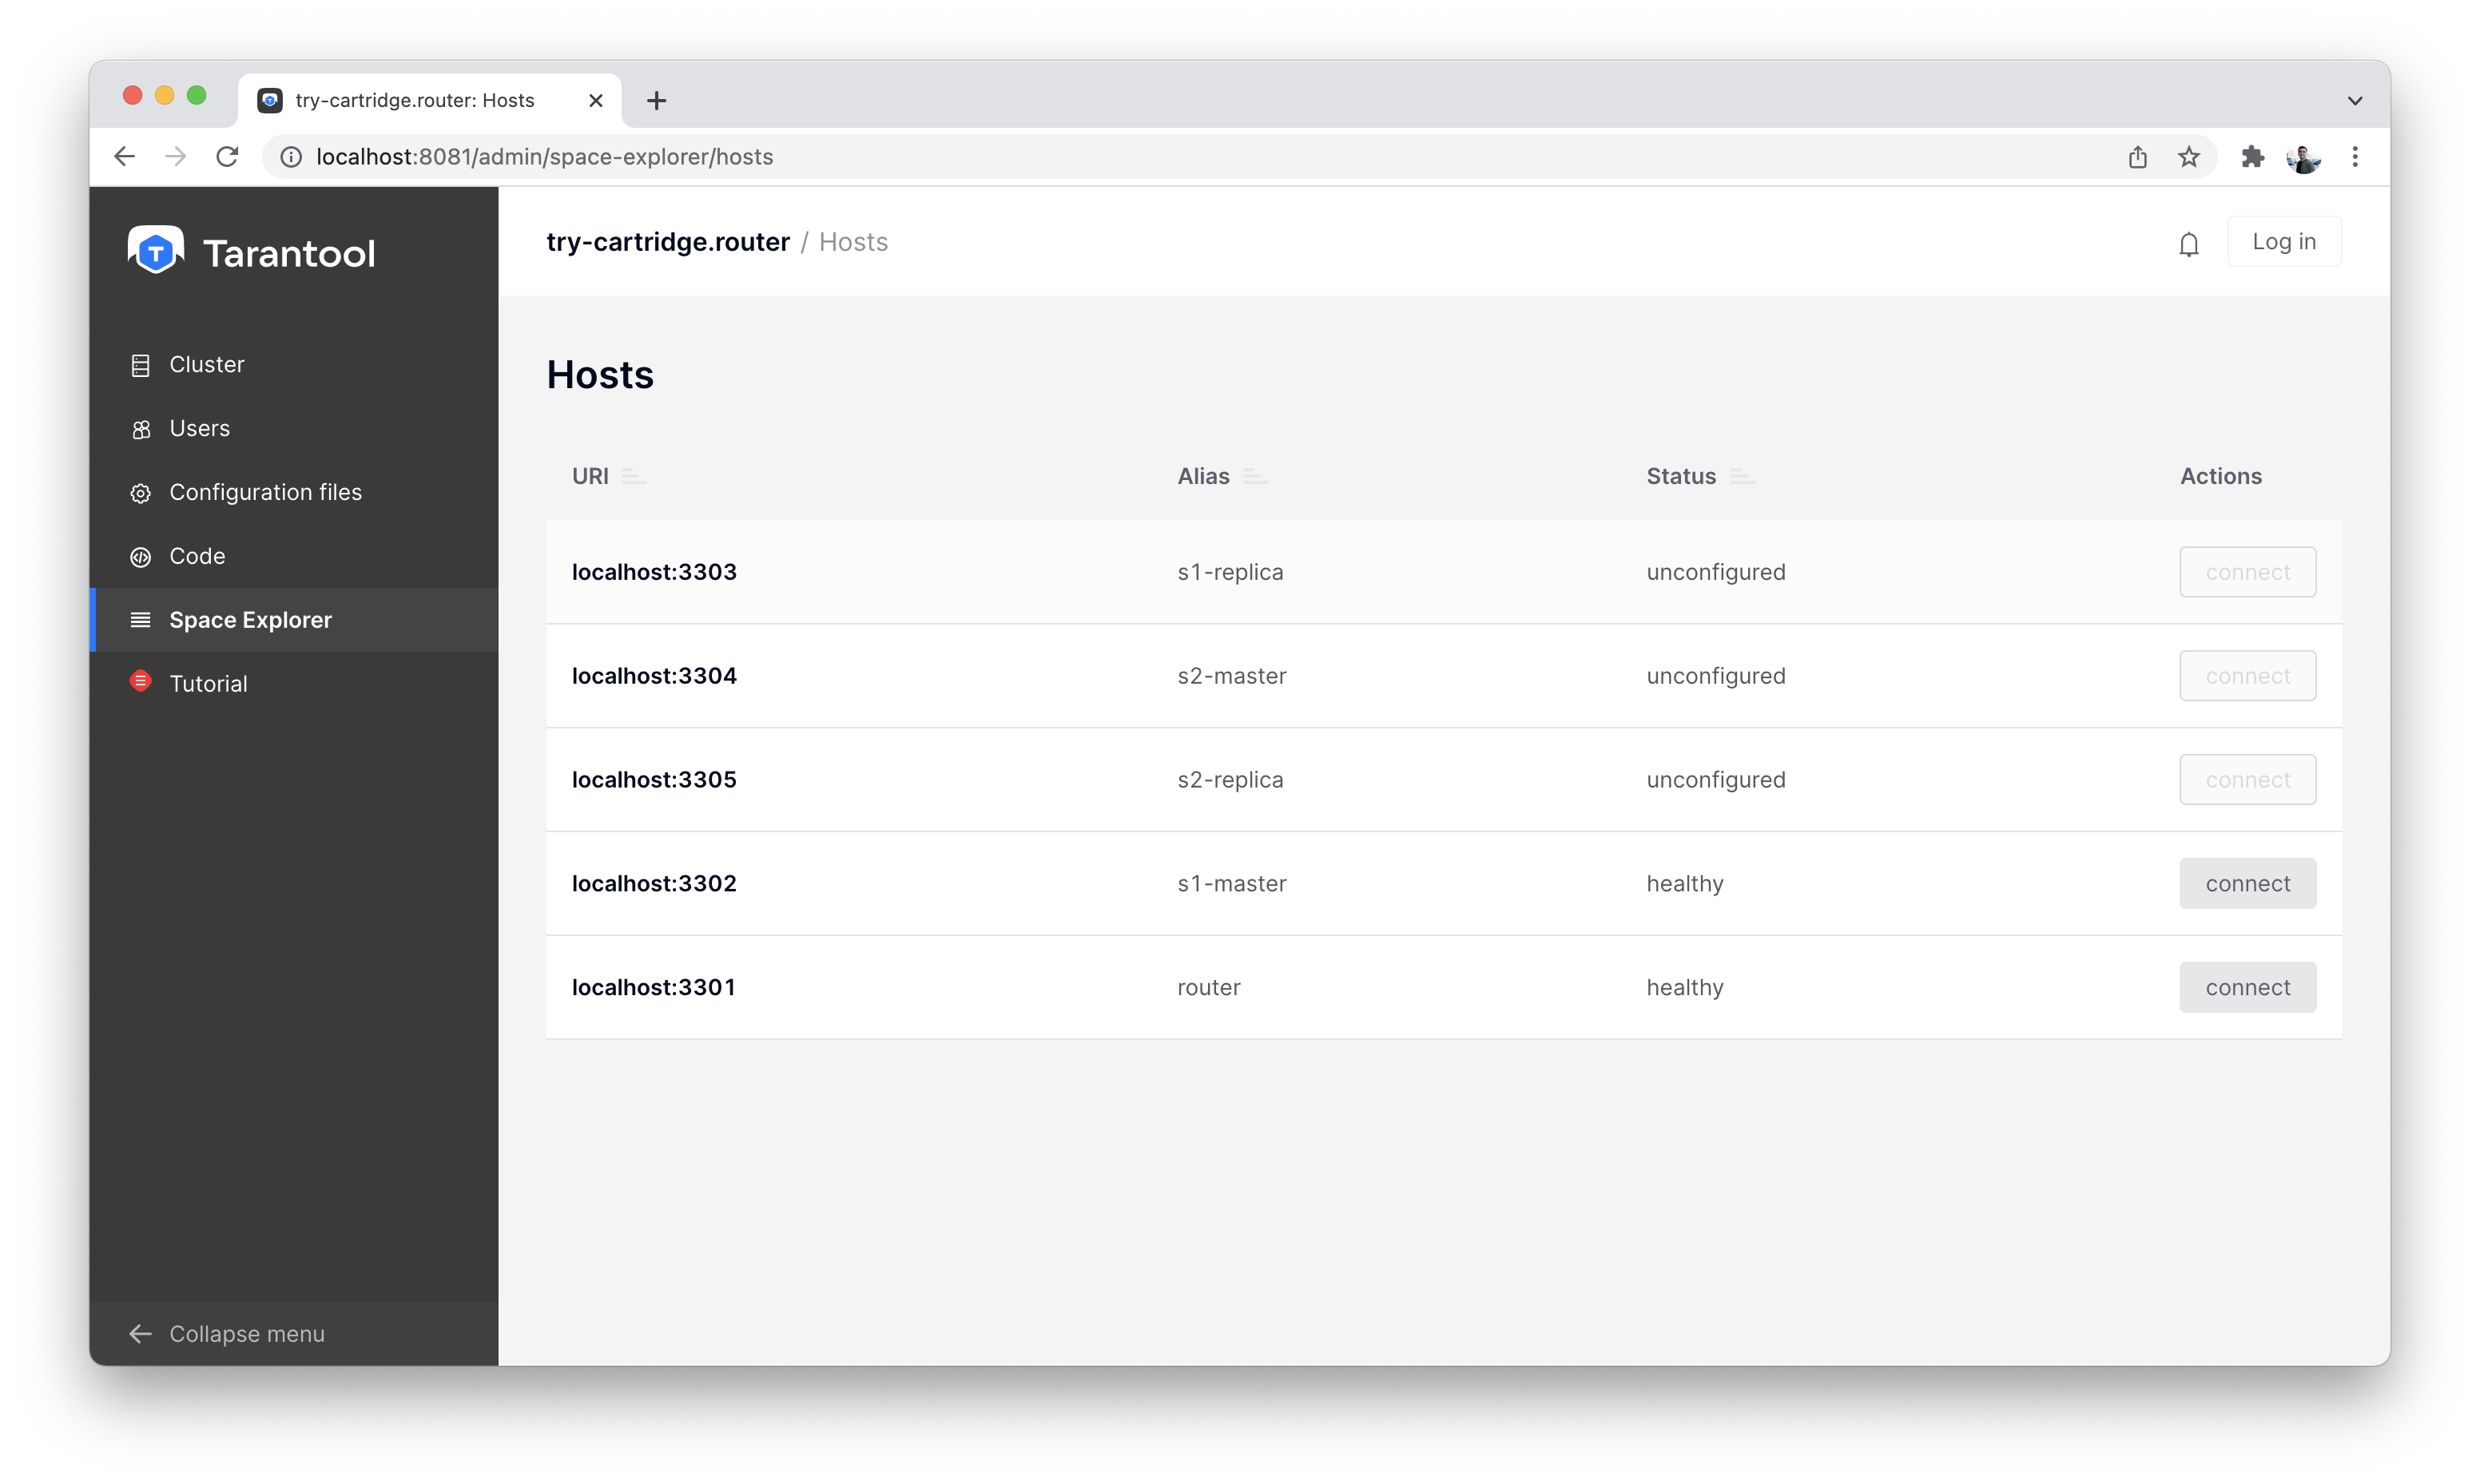
We see that we have 5 unconfigured instances on the “Cluster” tab.
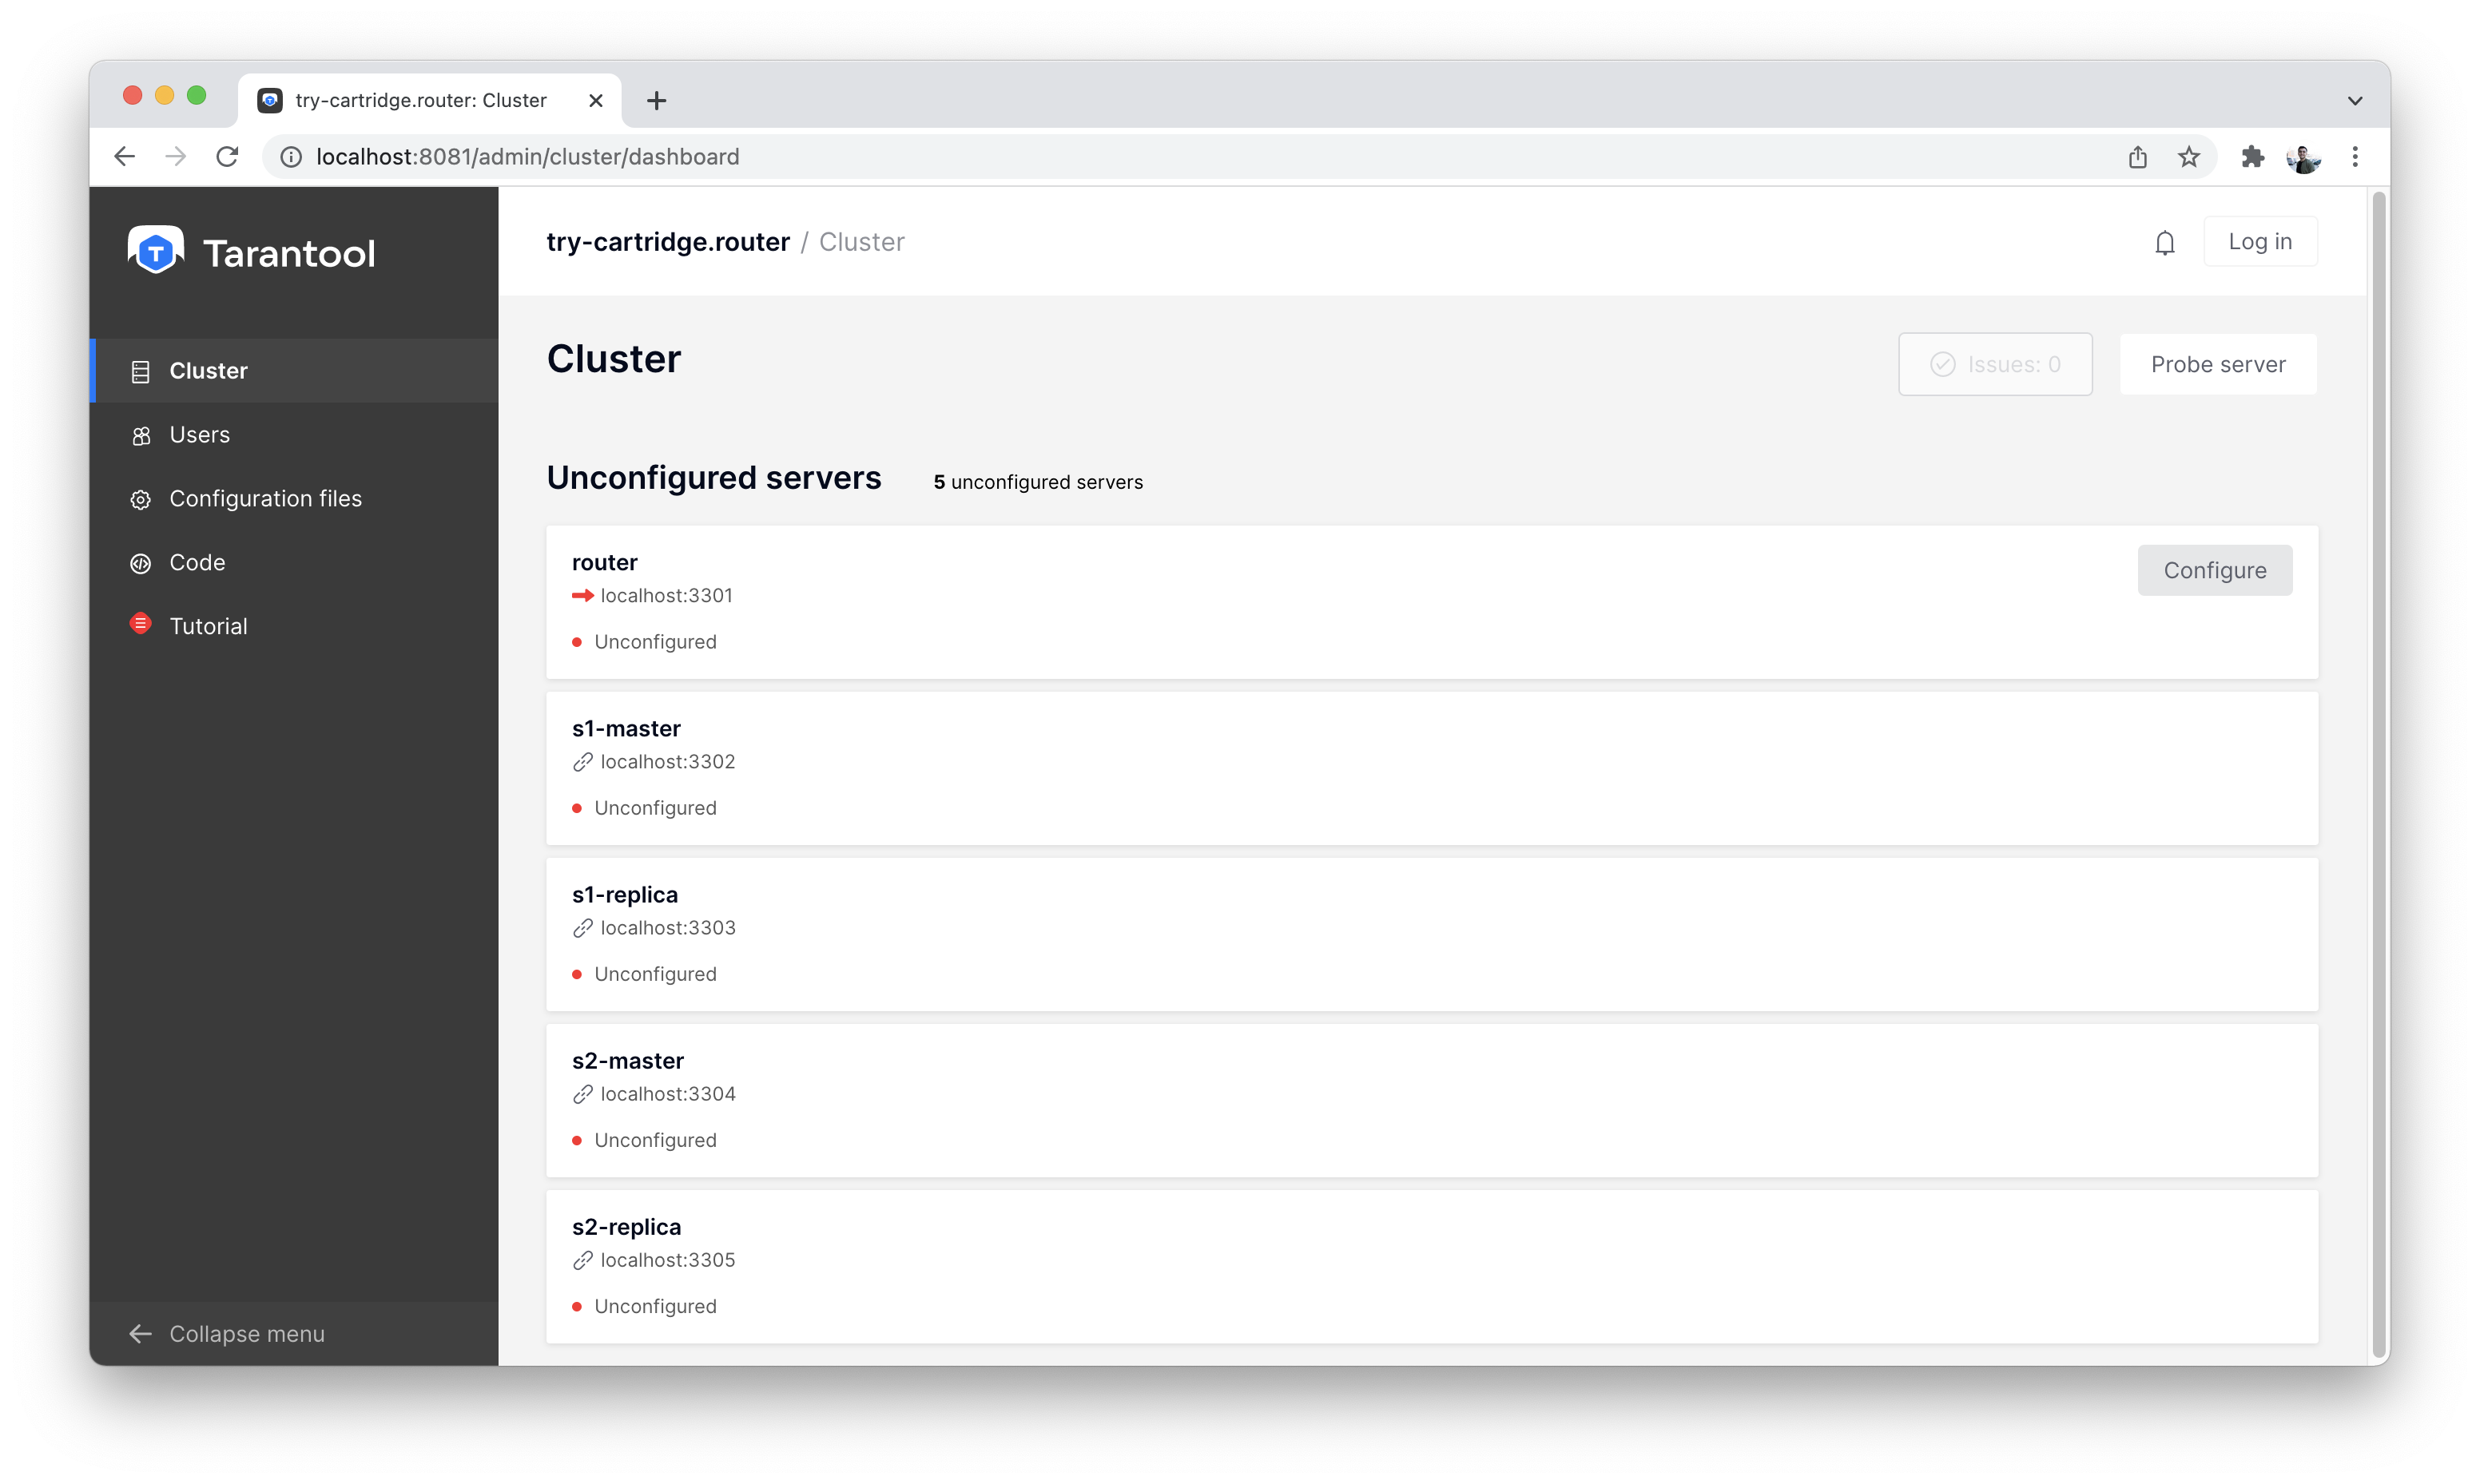
List of all nodes
Let’s create one router and one storage for a start.
First, click the “Configure” button on the “router” instance and configure it as in the screenshot below:
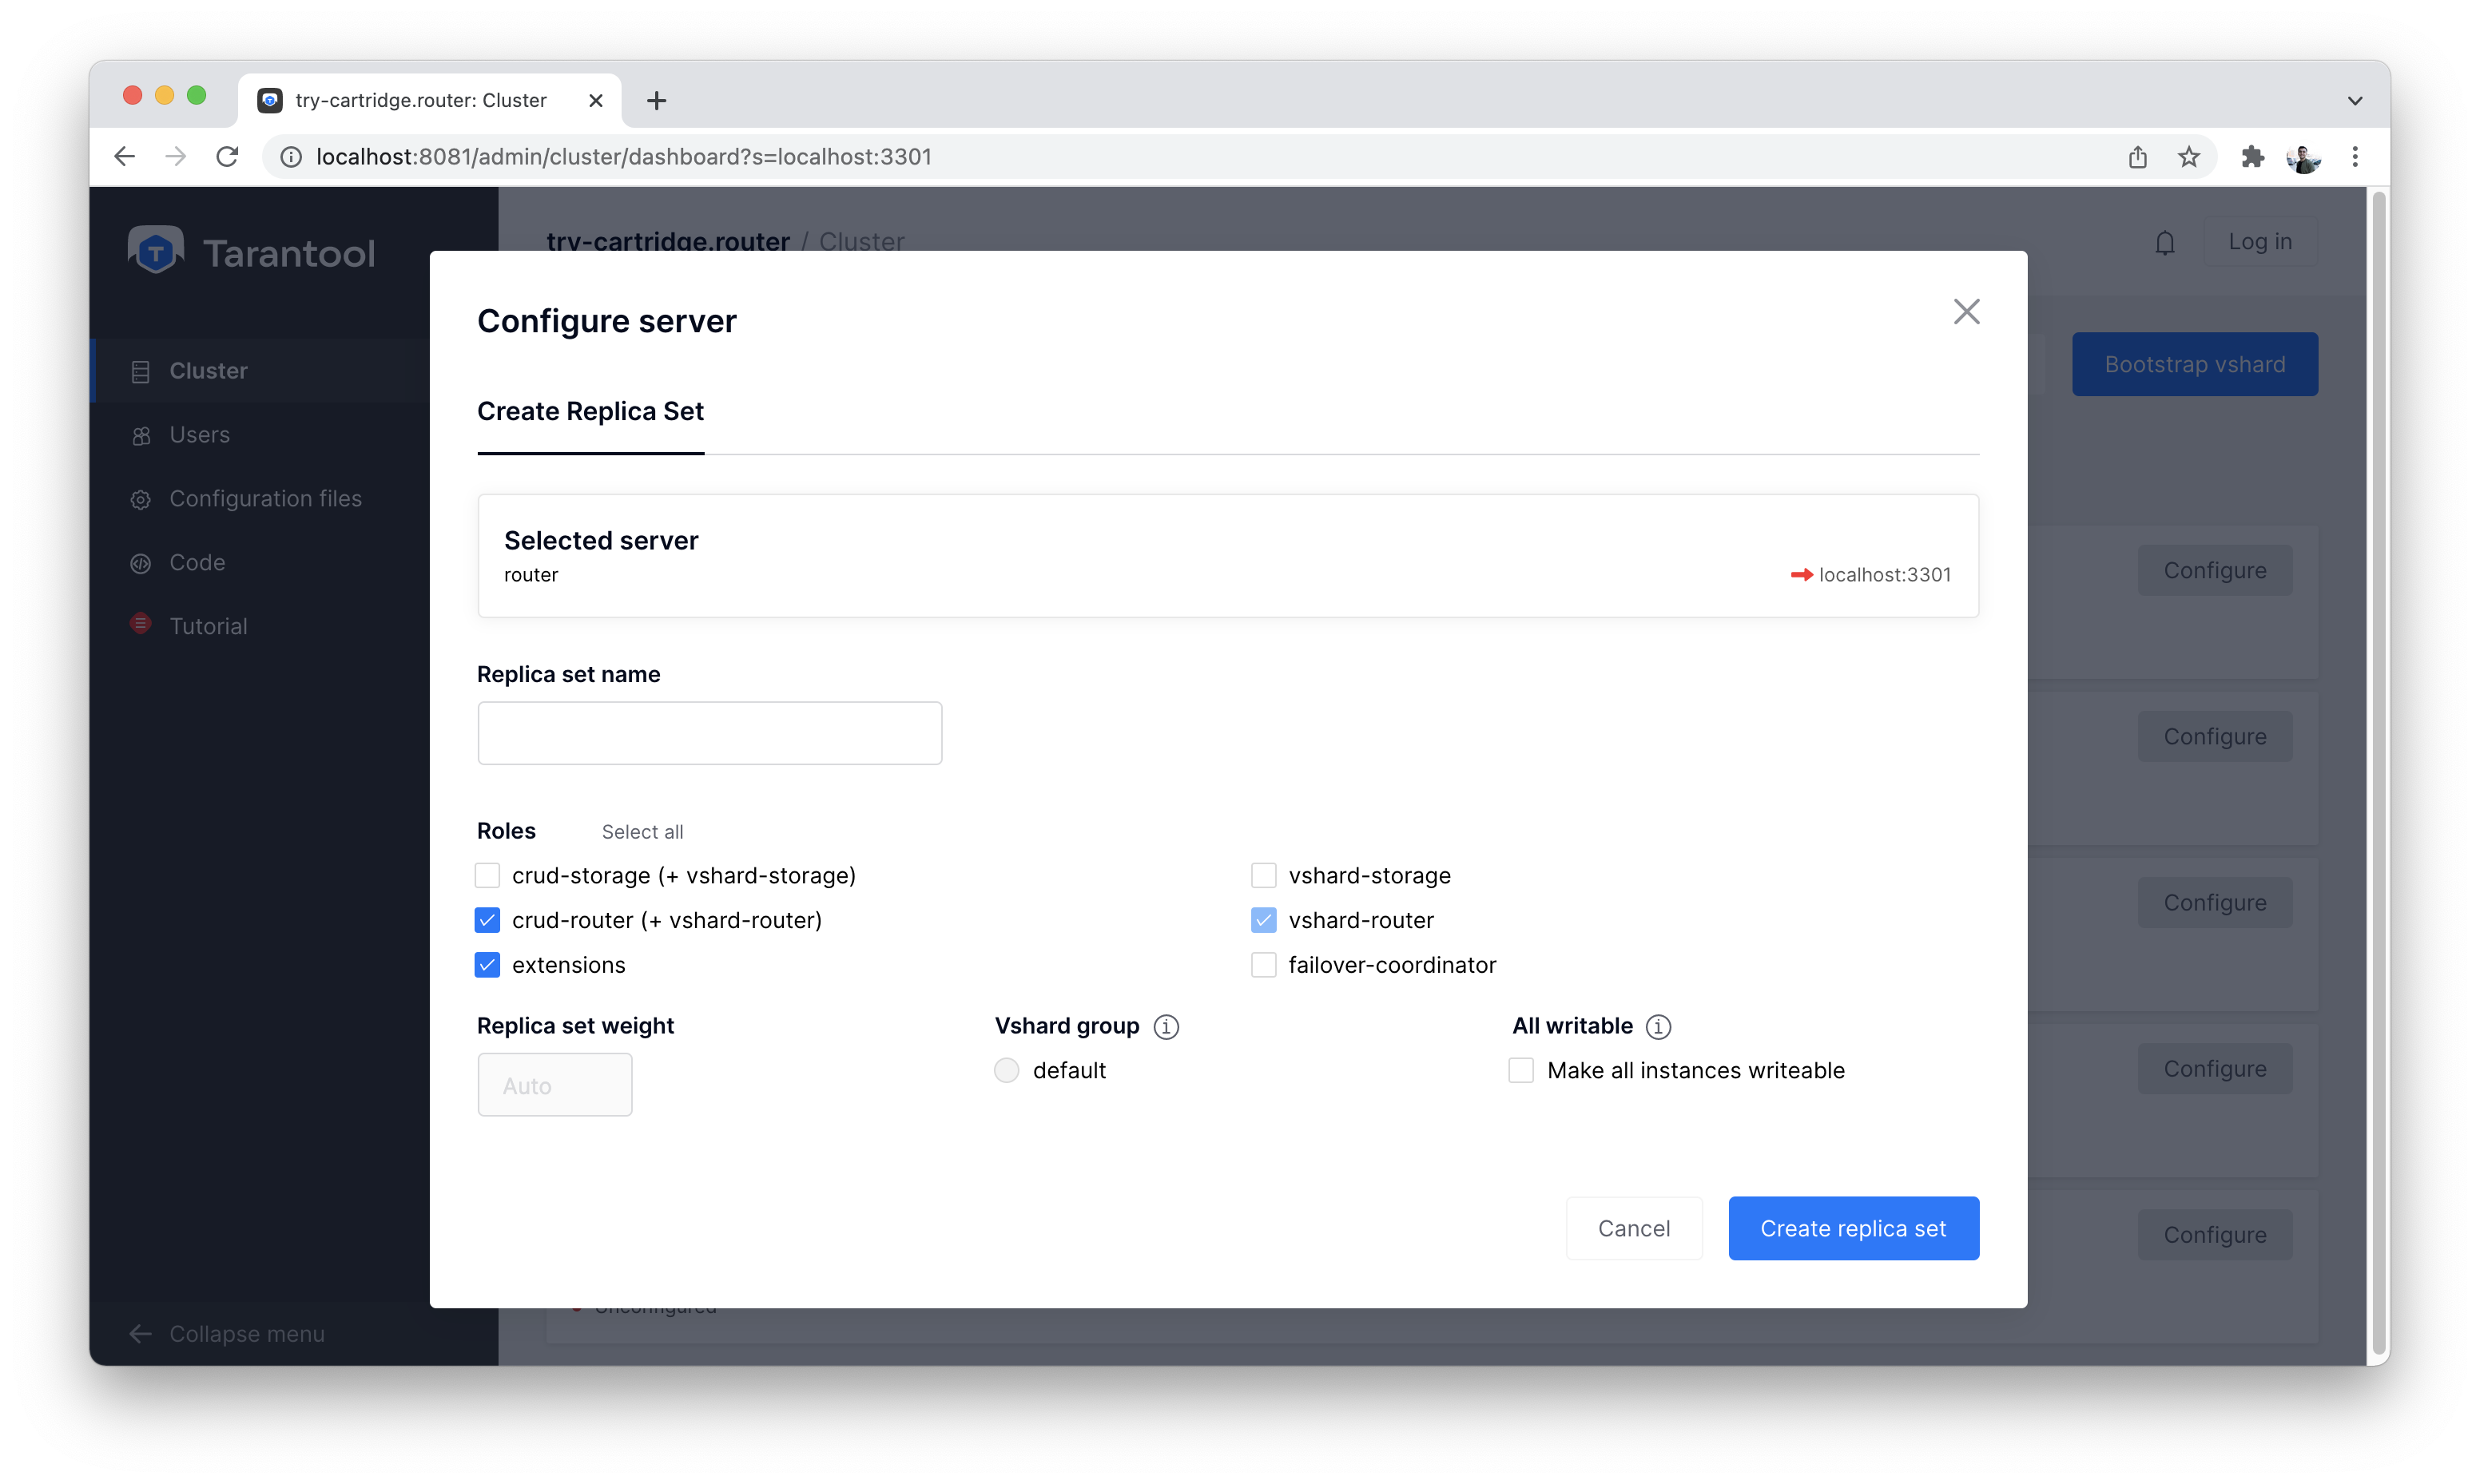
Configuring a router
Next, we configure the “s1-master” instance:
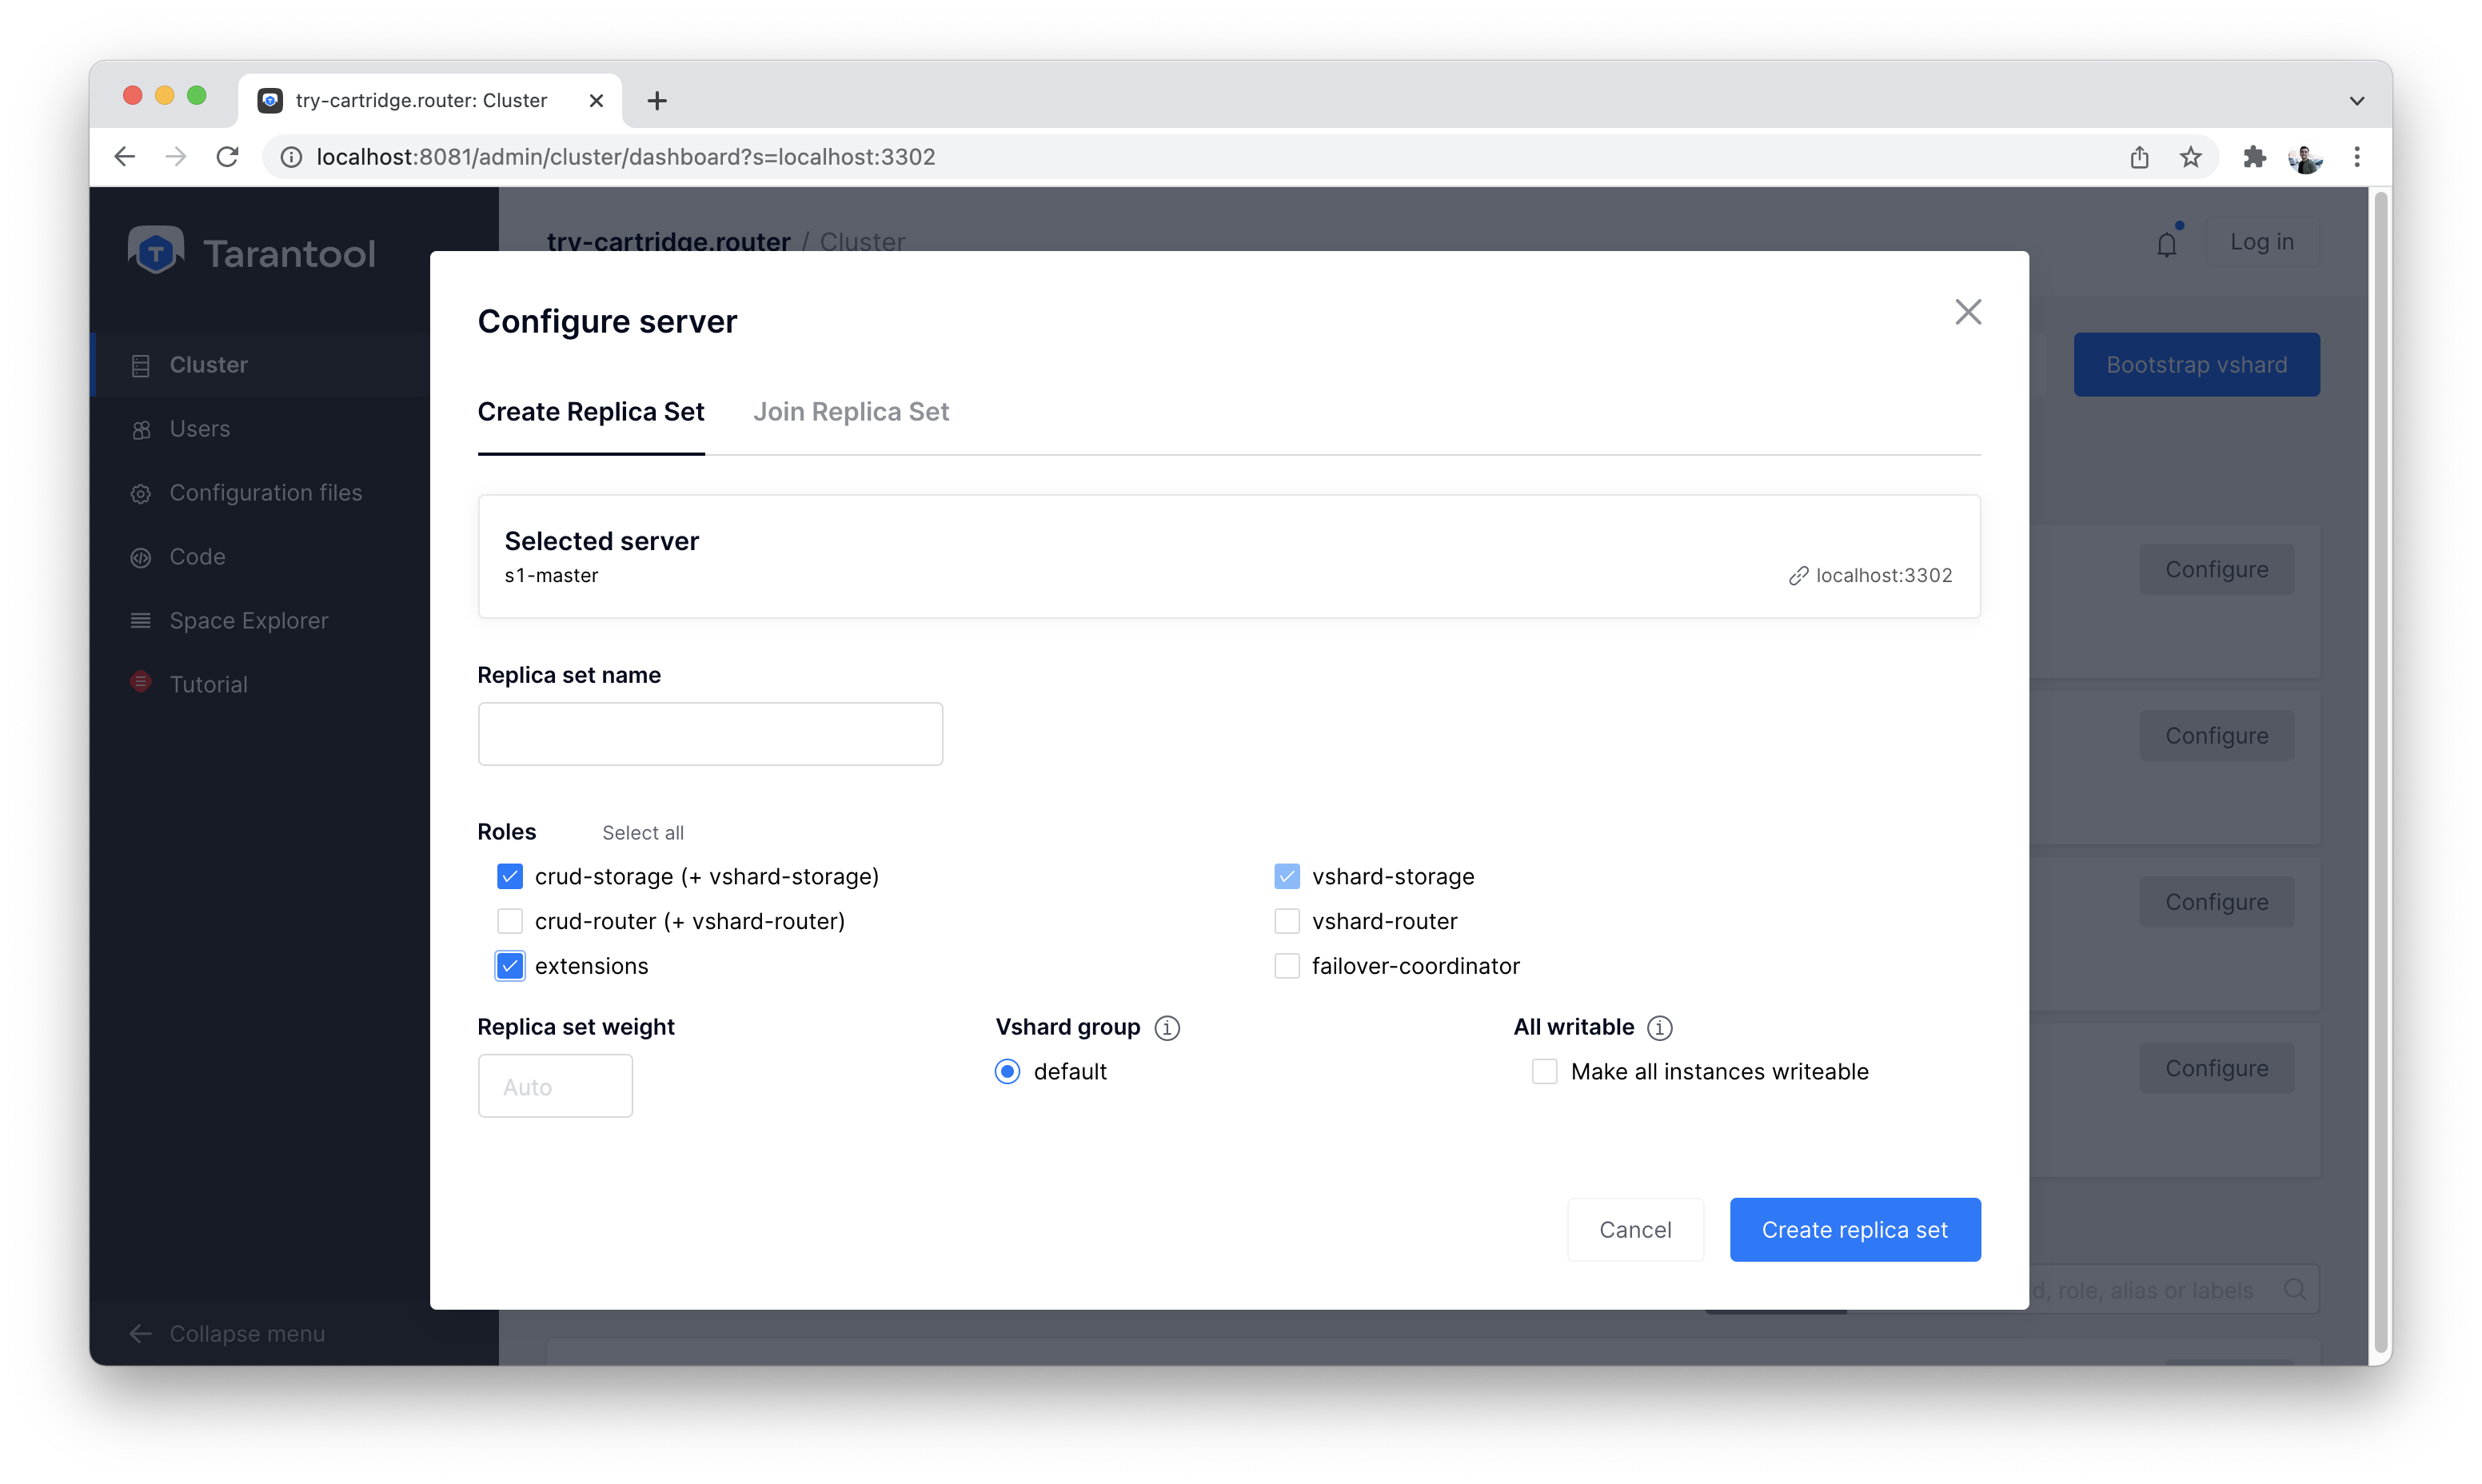
Configuring s1-master
It will look something like this:
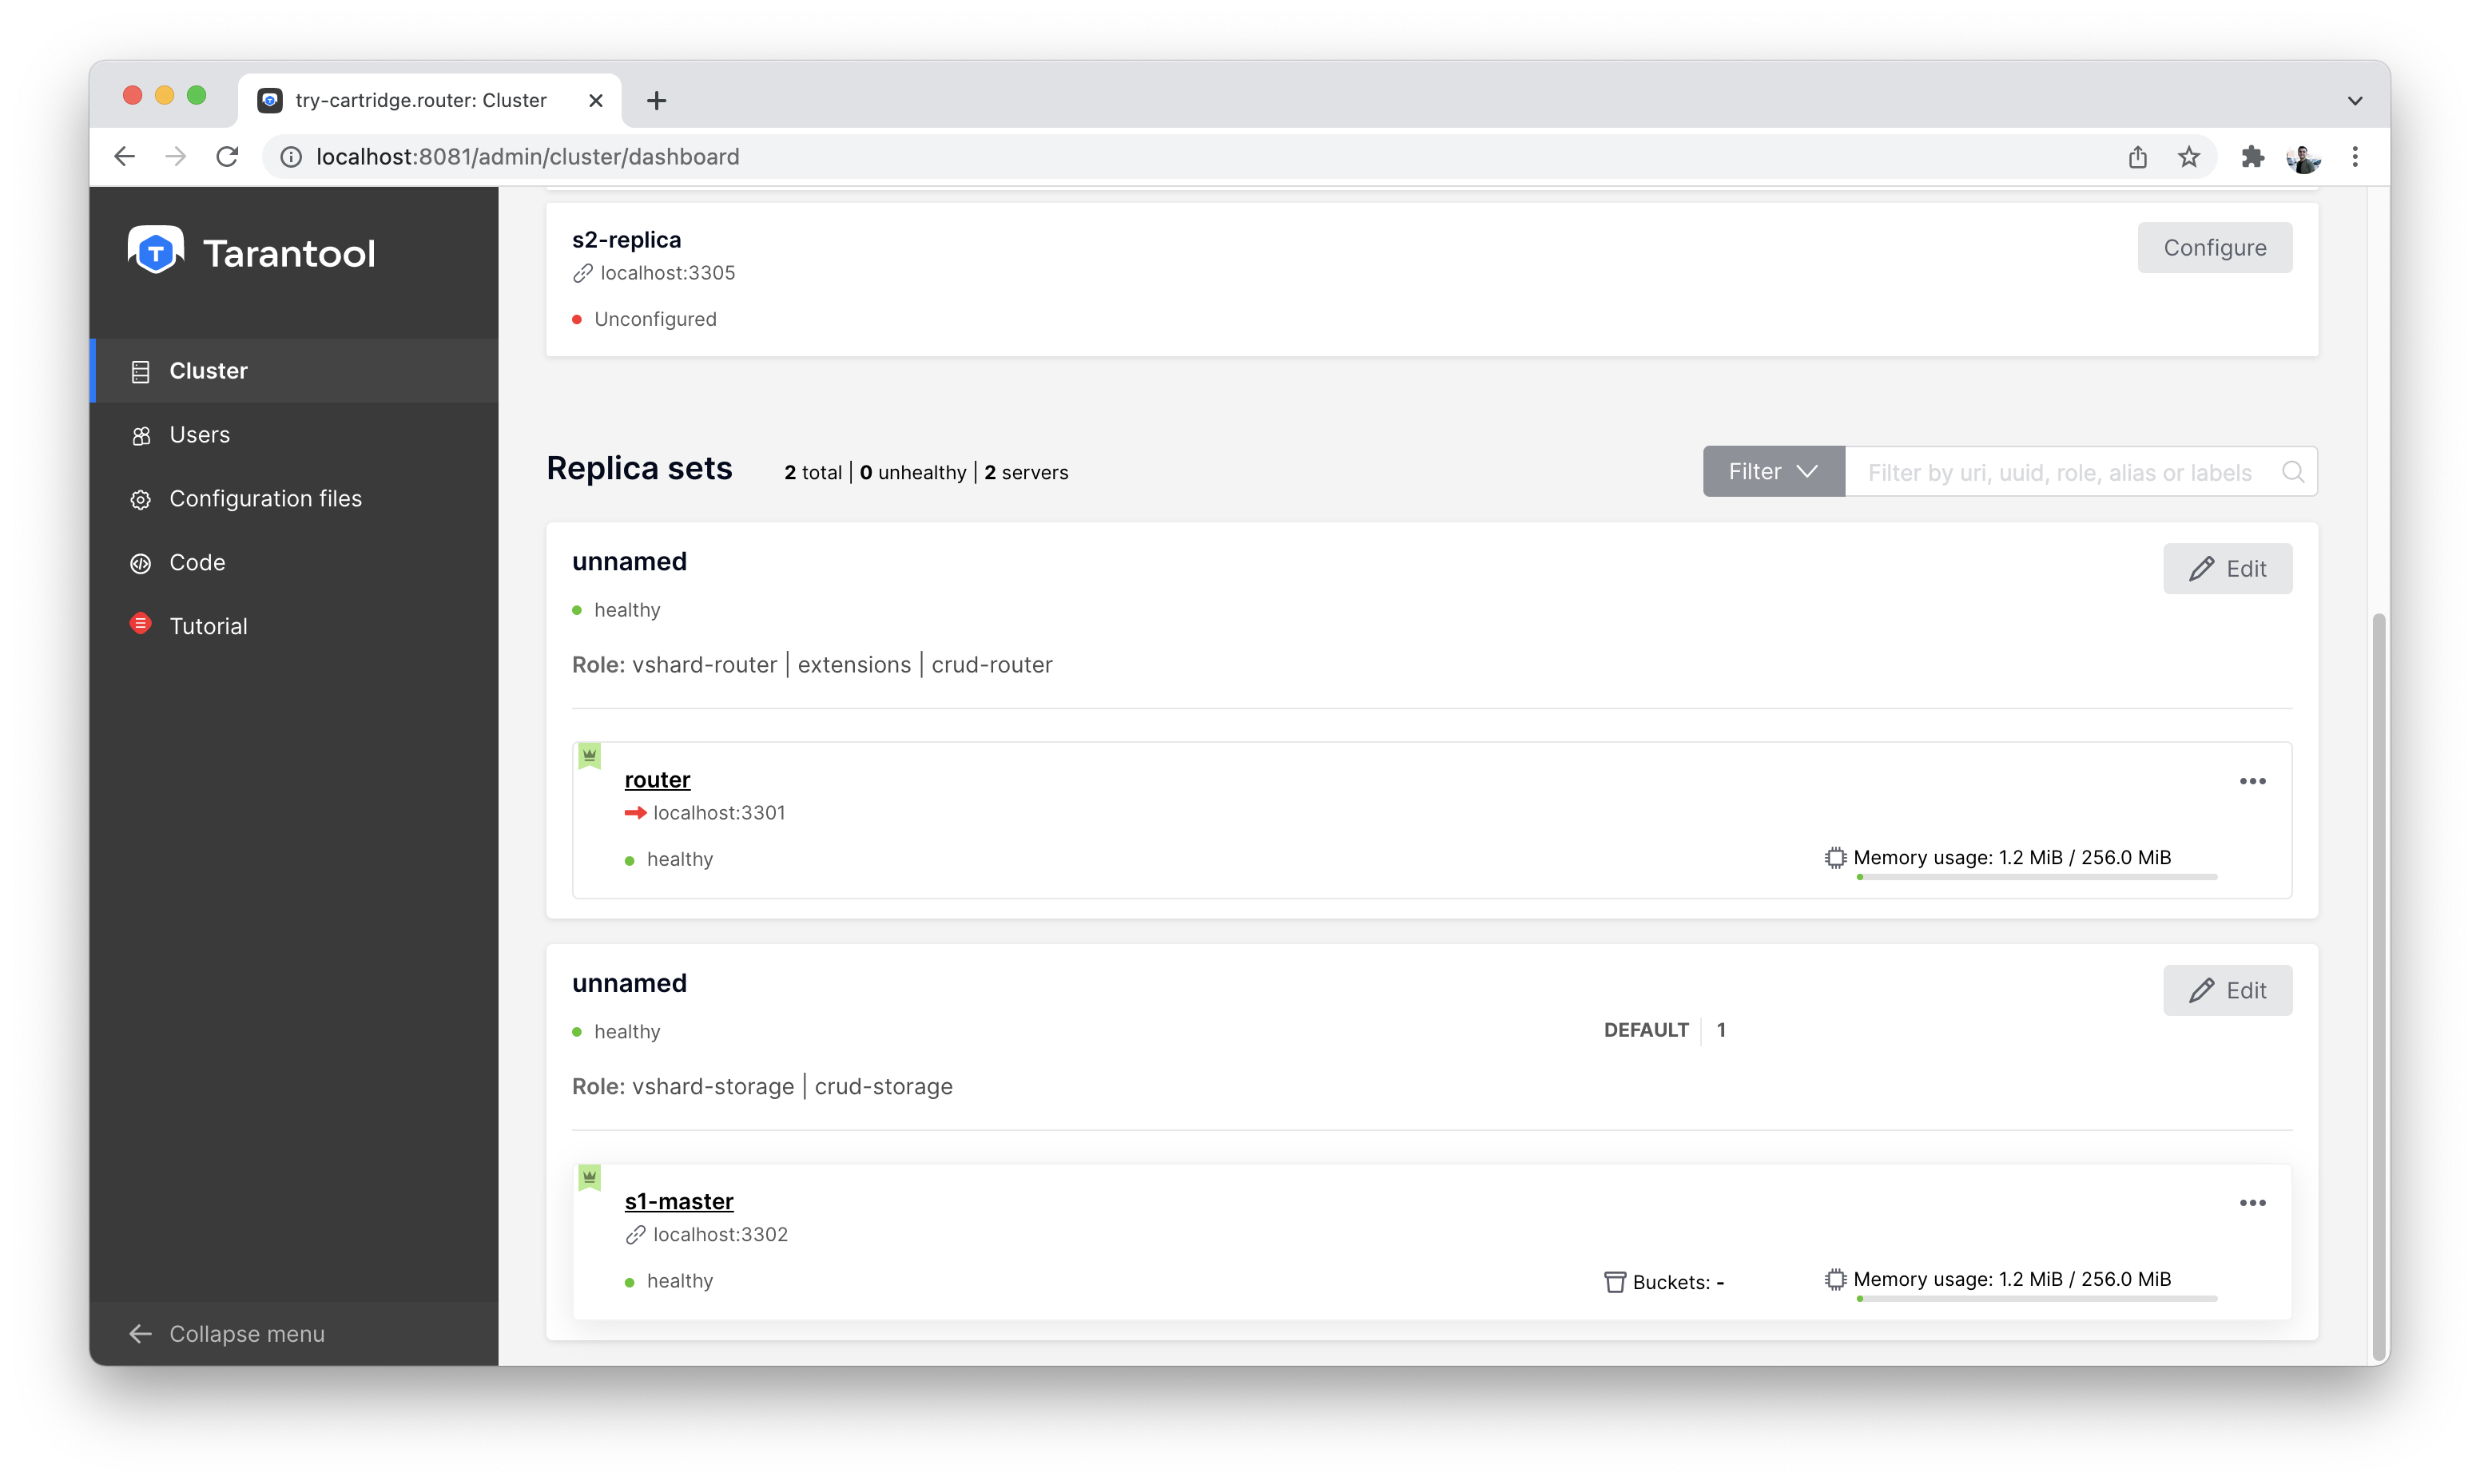
Cluster view after first setup
Let’s enable sharding in the cluster using the “Bootstrap vshard” button. It is located in the top right corner.
Let’s start with the data schema – take a look at the Code tab on the left.
There you can find a file called schema.yml. In this file, you can
describe the entire cluster’s data schema, edit the current schema,
validate its correctness, and apply it to the whole cluster.
First, let’s create the necessary tables. In Tarantool, they are called spaces.
We need to store:
- Users
- Videos with descriptions
- Likes for each video
Copy the schema description from the code block below and paste it in the schema.yml file on the Code tab.
Click the “Apply” button.
After that, the data schema will be described in the cluster.
This is what our data schema will look like:
spaces:
  users:
    engine: memtx
    is_local: false
    temporary: false
    sharding_key:
    - "user_id"
    format:
    - {name: bucket_id, type: unsigned, is_nullable: false}
    - {name: user_id, type: uuid, is_nullable: false}
    - {name: fullname, type: string, is_nullable: false}
    indexes:
    - name: user_id
      unique: true
      parts: [{path: user_id, type: uuid, is_nullable: false}]
      type: HASH
    - name: bucket_id
      unique: false
      parts: [{path: bucket_id, type: unsigned, is_nullable: false}]
      type: TREE
  videos:
    engine: memtx
    is_local: false
    temporary: false
    sharding_key:
    - "video_id"
    format:
    - {name: bucket_id, type: unsigned, is_nullable: false}
    - {name: video_id, type: uuid, is_nullable: false}
    - {name: description, type: string, is_nullable: true}
    indexes:
    - name: video_id
      unique: true
      parts: [{path: video_id, type: uuid, is_nullable: false}]
      type: HASH
    - name: bucket_id
      unique: false
      parts: [{path: bucket_id, type: unsigned, is_nullable: false}]
      type: TREE

  likes:
    engine: memtx
    is_local: false
    temporary: false
    sharding_key:
    - "video_id"
    format:
    - {name: bucket_id, type: unsigned, is_nullable: false}
    - {name: like_id, type: uuid, is_nullable: false}
    - {name: user_id, type: uuid, is_nullable: false}
    - {name: video_id, type: uuid, is_nullable: false}
    - {name: timestamp, type: string, is_nullable: true}
    indexes:
    - name: like_id
      unique: true
      parts: [{path: like_id, type: uuid, is_nullable: false}]
      type: HASH
    - name: bucket_id
      unique: false
      parts: [{path: bucket_id, type: unsigned, is_nullable: false}]
      type: TREE
It’s simple. Let’s take a closer look at the essential points.
Tarantool has two built-in storage engines: memtx and vinyl. memtx stores all data in RAM while asynchronously writing to disk so that nothing gets lost.
Vinyl is a classic engine for storing data on the hard drive. It is optimized for write-intensive scenarios.
In TikTok, there are a lot of simultaneous readings and posts: users watch videos, like them, and comment on them. Therefore, let’s use memtx.
The configuration above describes three memtx spaces (tables) and the necessary indexes for each of the spaces.
Each space has two indexes:
- The primary key, which is required to read/write data.
- An index on the bucket_id field, which is a service field used for sharding.
Important: The name bucket_id is reserved. If you choose
another name, sharding won’t work for this space.
If you don’t use sharding in your project, you can remove the second index.
To understand which field to shard data by, Tarantool uses
sharding_key. sharding_key points to fields in the space by
which database records will be sharded. There can be more than one such field, but
in this example, we will only use one. When some data is inserted,
Tarantool forms a hash from this field, calculates the bucket number,
and selects the storage to record the data into.
Yes, buckets can repeat, and each storage stores a specific range of buckets.
Here are a couple more interesting facts:
- The
partsfield in the index description can contain several fields, which allows building a composite index. You won’t need it in this tutorial. - Tarantool does not support foreign keys, so you have to check manually
upon insertion
that
video_idanduser_idexist in thelikesspace.
We will write data to the Tarantool cluster using the CRUD module. You don’t have to specify the shard you want to read from or write to – the module does it for you.
Important: All cluster operations must be performed only on the router and using the CRUD module.
Let’s connect the CRUD module in the code and write three procedures:
- User creation
- Adding a video
- Liking a video
The procedures must be described in a special file. To do this, go to
the “Code” tab. Create a new directory called extensions, and
in this directory, create the file api.lua.
Paste the code below into api.lua and click “Apply”.
local cartridge = require('cartridge')
local crud = require('crud')
local uuid = require('uuid')
local json = require('json')

function add_user(request)
    local fullname = request:post_param("fullname")
    local result, err = crud.insert_object('users', {user_id = uuid.new(), fullname = fullname})
    if err ~= nil then
        return {body = json.encode({status = "Error!", error = err}), status = 500}
    end

    return {body = json.encode({status = "Success!", result = result}), status = 200}
end

function add_video(request)
    local description = request:post_param("description")
    local result, err = crud.insert_object('videos', {video_id = uuid.new(), description = description})
    if err ~= nil then
        return {body = json.encode({status = "Error!", error = err}), status = 500}
    end

    return {body = json.encode({status = "Success!", result = result}), status = 200}
end

function like_video(request)
    local video_id = request:post_param("video_id")
    local user_id = request:post_param("user_id")

    local result, err = crud.insert_object('likes', {like_id = uuid.new(),
                                                video_id = uuid.fromstr(video_id),
                                                user_id = uuid.fromstr(user_id)})
    if err ~= nil then
        return {body = json.encode({status = "Error!", error = err}), status = 500}
    end

    return {body = json.encode({status = "Success!", result = result}), status = 200}
end

return {
    add_user = add_user,
    add_video = add_video,
    like_video = like_video,
}
Clients will visit the Tarantool cluster using the HTTP protocol. The cluster already has a built-in HTTP server.
To configure HTTP paths, you need to write a configuration
file. Go to the “Code” tab. Create the file config.yml
in the extensions directory, which you created on the last step.
Paste the configuration example below into config.yml and click “Apply”.
---
 functions:

   add_user:
     module: extensions.api
     handler: add_user
     events:
     - http: {path: "/add_user", method: POST}

   add_video:
     module: extensions.api
     handler: add_video
     events:
     - http: {path: "/add_video", method: POST}

   like_video:
     module: extensions.api
     handler: like_video
     events:
     - http: {path: "/like_video", method: POST}
...
Done! Let’s make test requests from the console.
curl -X POST --data "fullname=Taran Tool" url/add_user
Note
In the requests, substitute url with the address of your sandbox.
The protocol must be strictly HTTP.
For example, if you’re following this tutorial with Try Tarantool, this request will look something like this (note that your hash is different):
curl -X POST --data "fullname=Taran Tool" http://artpjcvnmwctc4qppejgf57.try.tarantool.io/add_user
But if you’ve bootstrapped Tarantool locally, the request will look as follows:
curl -X POST --data "fullname=Taran Tool" http://localhost:8081/add_user
We’ve just created a user and got their UUID. Let’s remember it.
curl -X POST --data "description=My first tiktok" url/add_video
Let’s say a user has added their first video with a description. The video clip also has a UUID. Let’s remember it, too.
In order to “like” the video, you need to specify the user UUID and the video UUID from the previous steps. Substitute the ellipses in the command below with the corresponding UUIDs:
curl -X POST --data "video_id=...&user_id=..." url/like_video
The result will be something like this:

Test queries in the console
In our example, you can “like” the video as many times as you want.
It makes no sense in the real life, but it will help us understand how
sharding works – more precisely, the sharding_key parameter.
Our sharding_key for the likes is video_id.
We also specified a sharding_key for the videos space. It means
that likes will be stored on the same storage as videos.
This ensures data locality with regard to storage and allows
getting all the information you need in one network trip to Storage.
More details are described on the next step.
Note
The following instructions are for Tarantool Enterprise Edition and the Try Tarantool cloud service.
The Space-Explorer tool is unavailable in the open-source version. Use the console to view data.
Check our documentation to learn more about data viewing. To learn how to connect to a Tarantool instance, read the basic Tarantool manual.
Go to the “Space-Explorer” tab to see all the nodes in the cluster. As we have only one storage and one router started so far, the data is stored on only one node.
Let’s go to the node s1-master: click “Connect” and select the necessary space.
Check that everything is in place and move on.
Space Explorer, host list
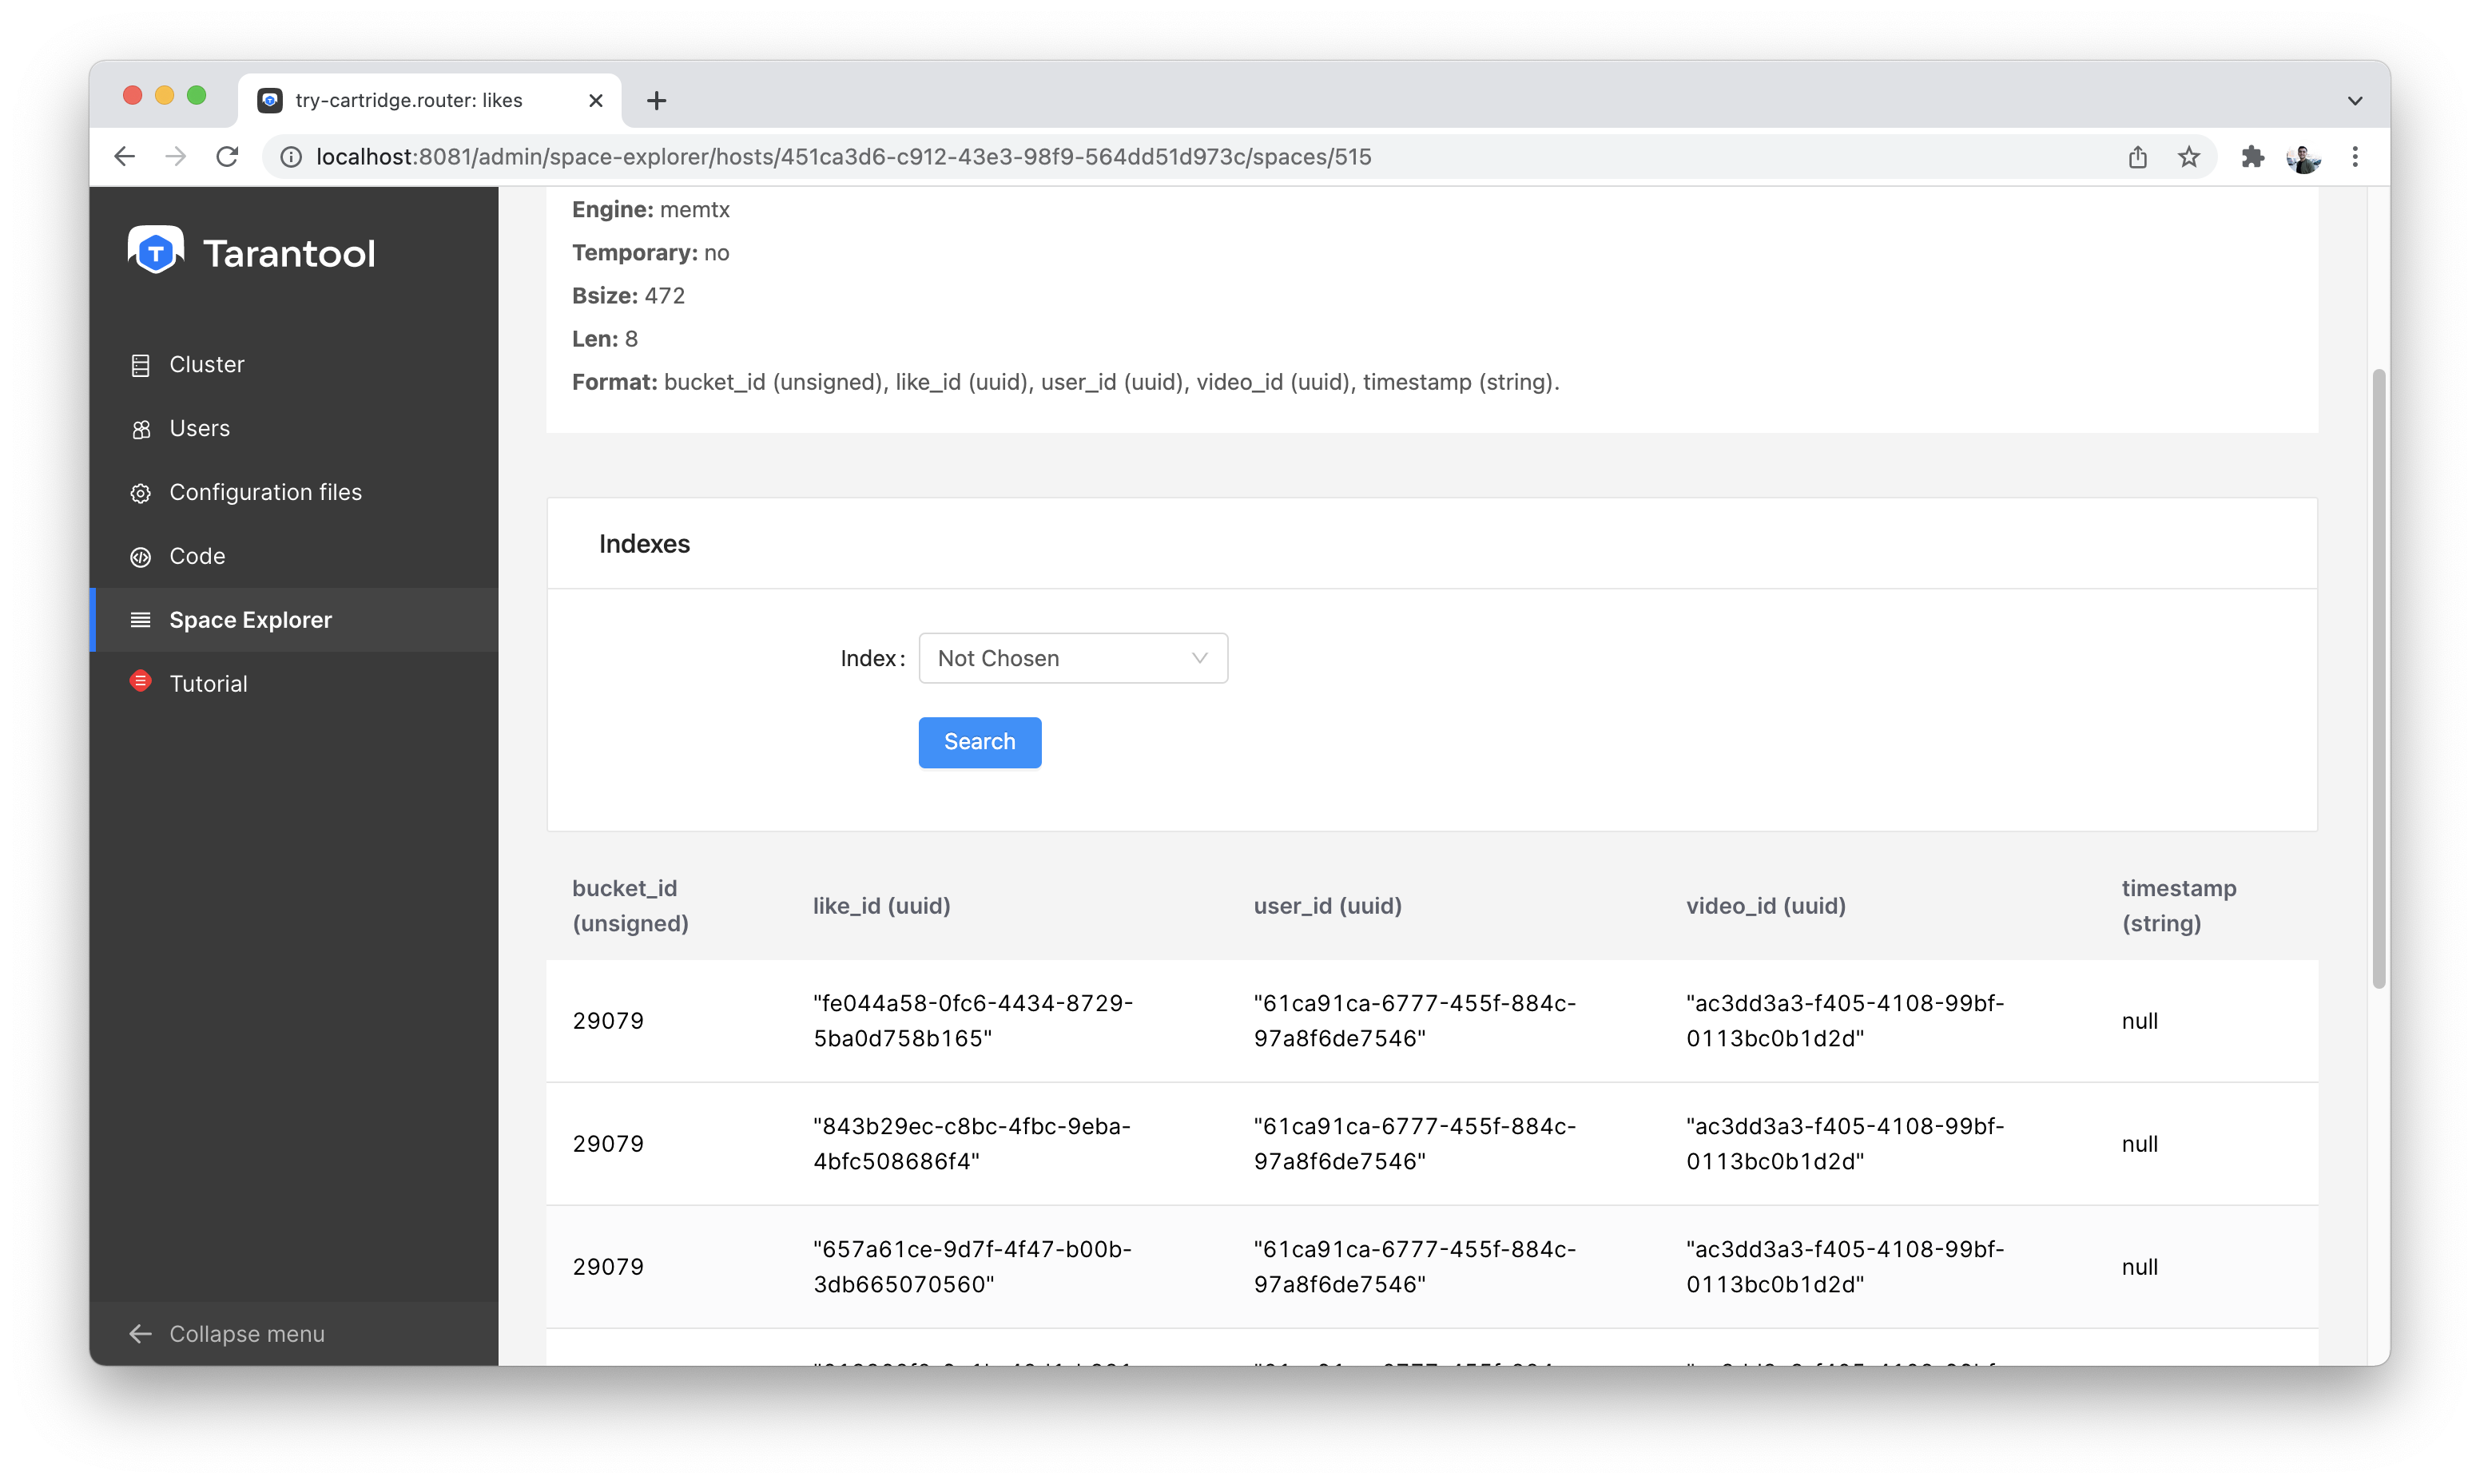
Space Explorer, viewing likes
Let’s create a second shard. Click on the “Cluster” tab, select
s2-master, and click “Configure”. Select the roles as shown in the picture:
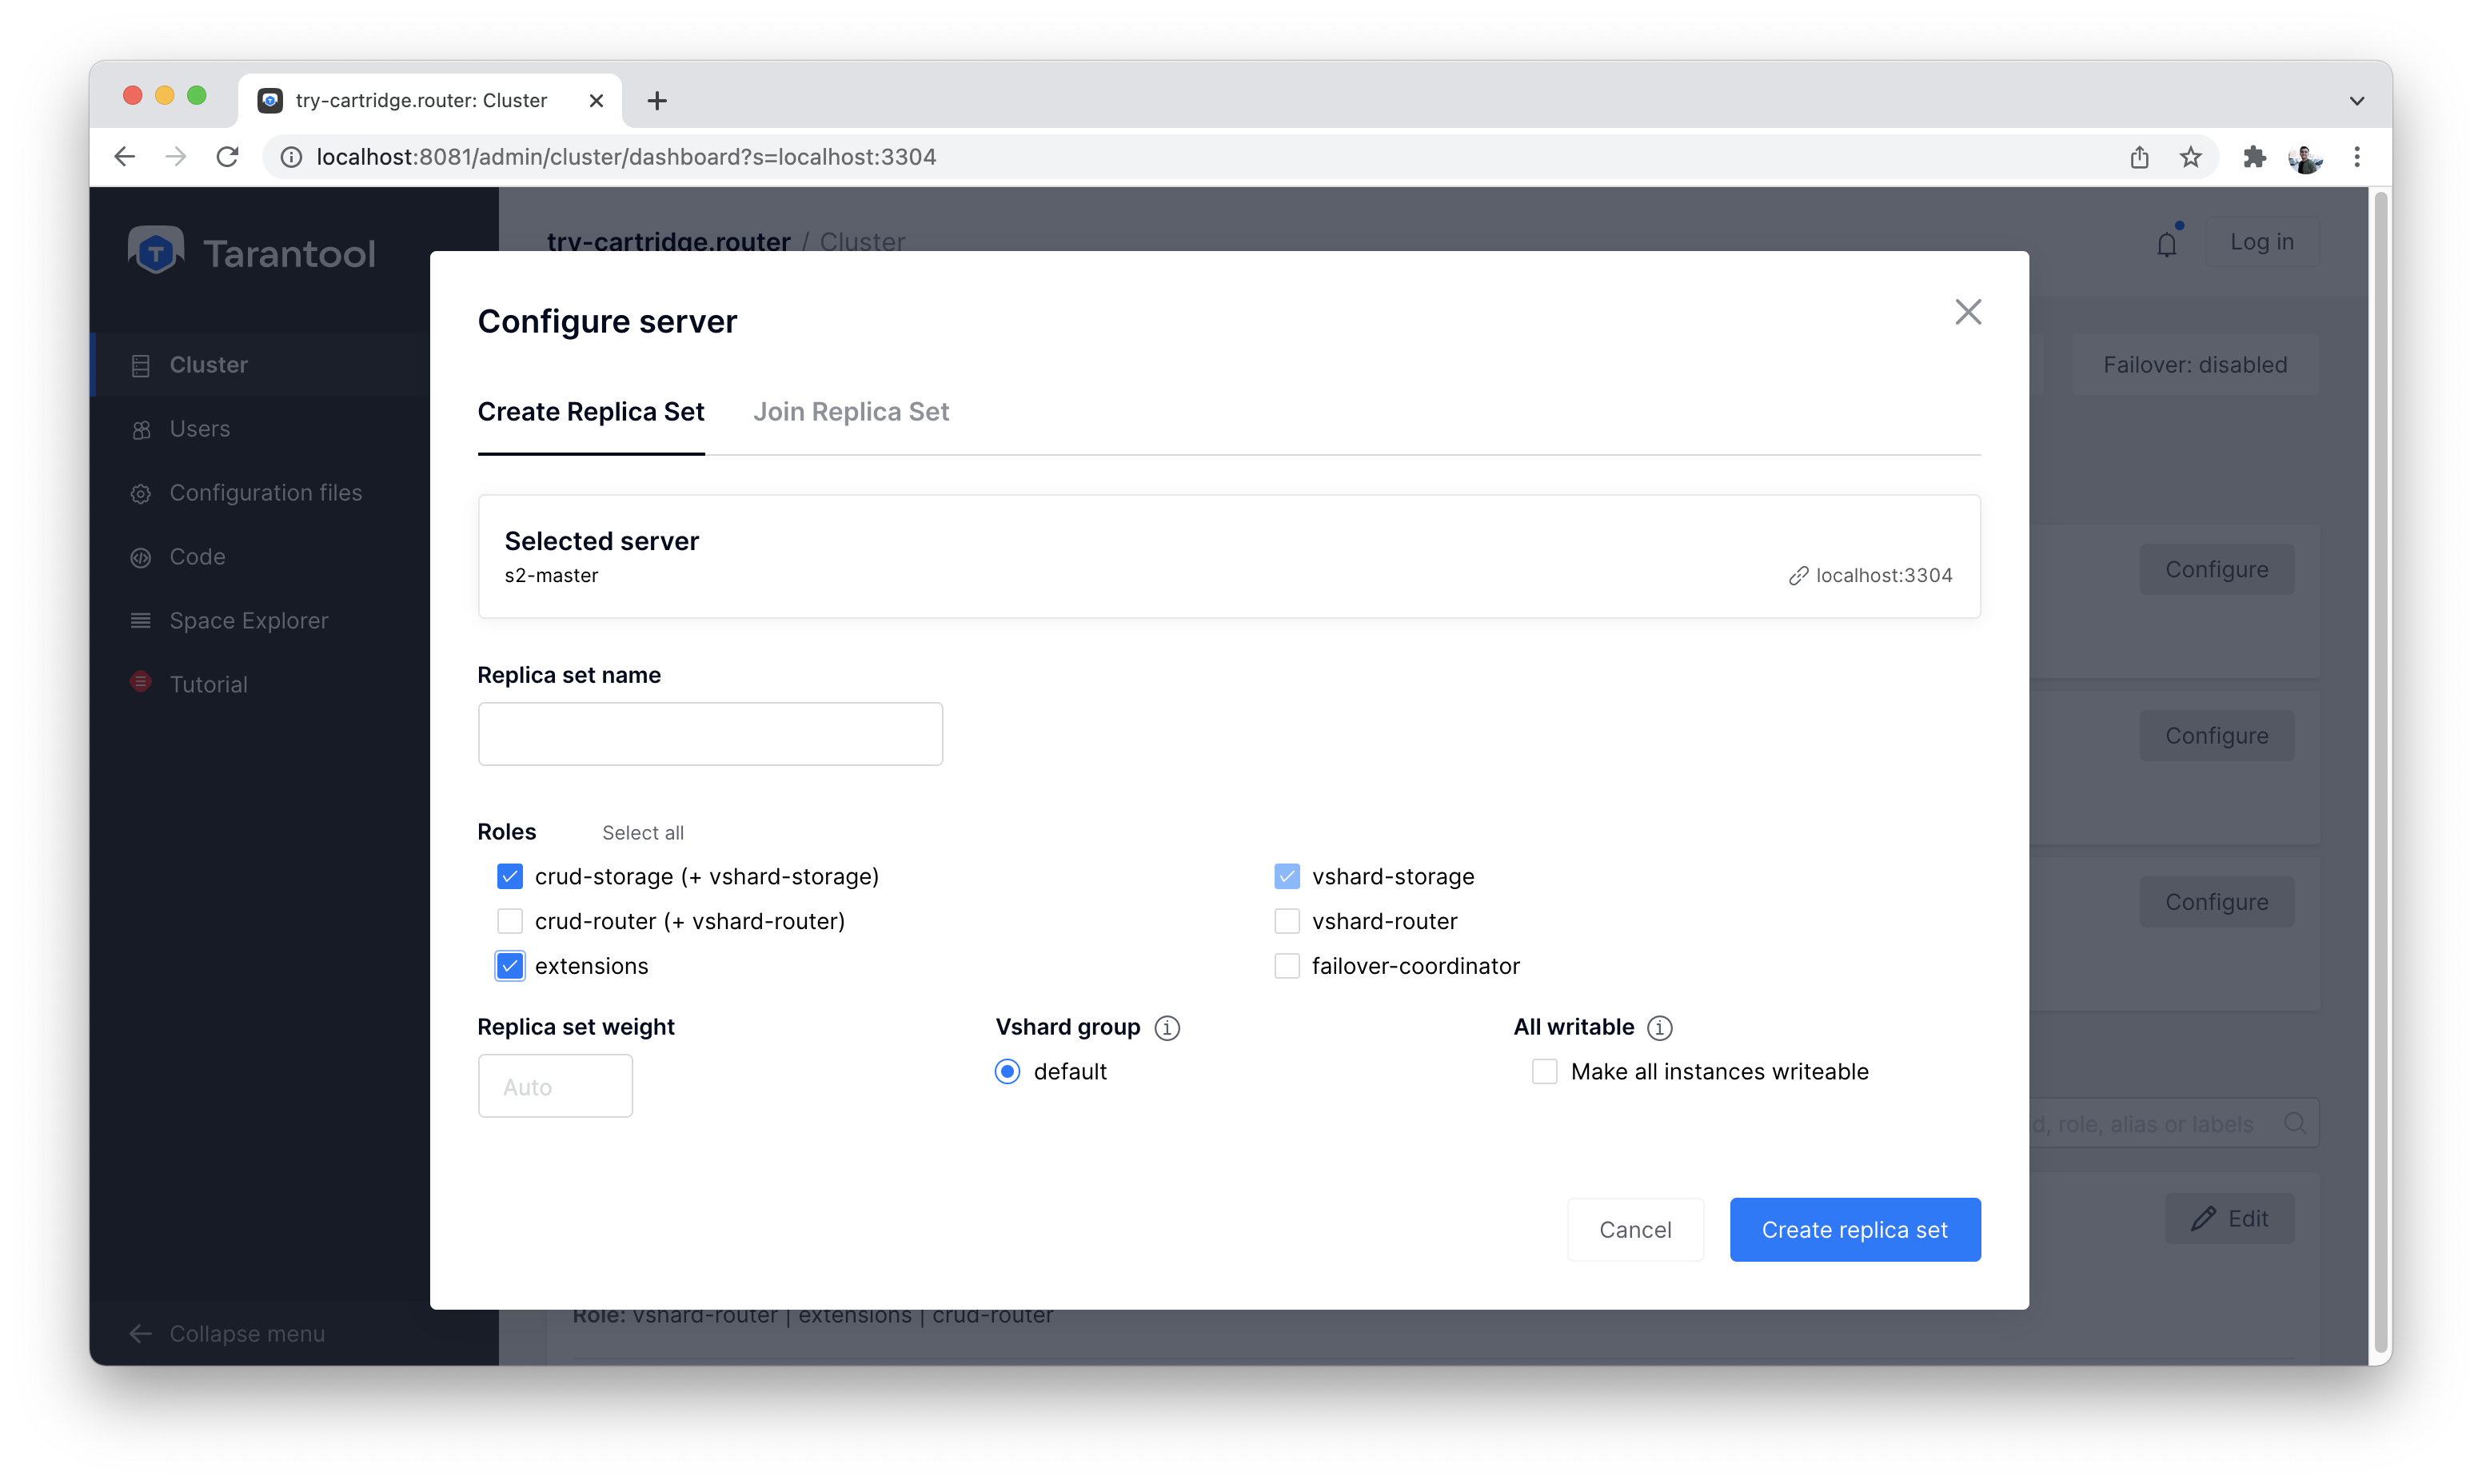
Cluster, new shard configuration screen
Click on the necessary roles and create a shard (replica set).
Now we have two shards – two logical nodes that
share data among themselves. The router decides what piece of data goes to what shard.
By default, the router uses the hash function from the field sharding_key
we’ve specified in the DDL.
To enable a new shard, you need to set its weight to one.
Go back to the “Cluster” tab, open the s2-master settings,
set the Replica set weight to 1, and apply.
Something has already happened. Let’s go to Space-Explorer and check the node
s2-master. It turns out that some of the data from the first shard
has already migrated here! The scaling is done automatically.
Now let’s try adding more data to the cluster via the HTTP API. We can check back later and make sure that the new data is also evenly distributed across the two shards.
In the s1-master settings, set Replica set weight to 0 and
apply. Wait for a few seconds, then go to Space-Explorer and look at the
data in s2-master. You will see that all the data has been migrated to
the remaining shard automatically.
Now we can safely disable the first shard for maintenance.